
 In this post, I am going to show how you can implement Navigation Drawer in your flutter project.
To add a drawer, in your build function ad drawer as follows
In this post, I am going to show how you can implement Navigation Drawer in your flutter project.
To add a drawer, in your build function ad drawer as follows
return Scaffold(
    appBar: AppBar( title: Text(widget.title), ),
    drawer: Drawer(
        child: ListView(
            children: <Widget>[]
        ),
    ),
    body: Container(),
);
The first item to the ListView is DrawerHeader.
DrawerHeader(
  child: Text("Header", style: TextStyle(color: Colors.white),),
  decoration: BoxDecoration(
    color: Colors.blue
  ),
),
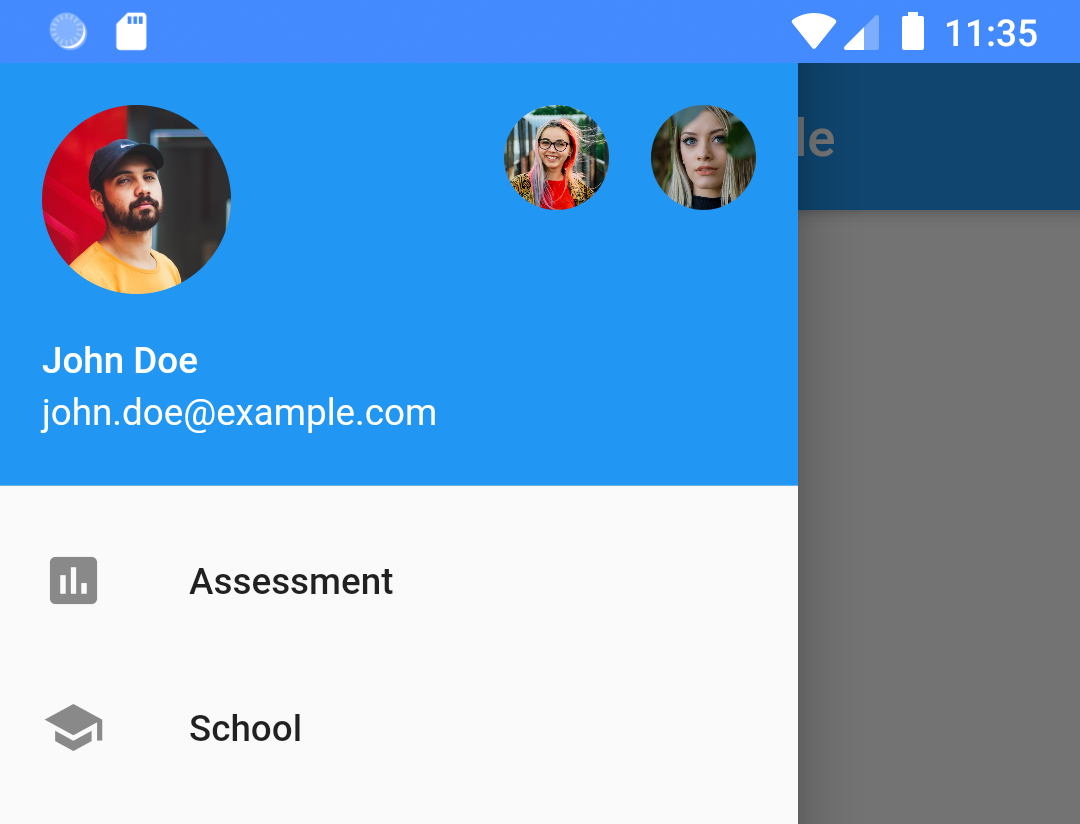
This is very basic, let’s try to replace DrawerHeader with user details for that we
use UserAccountsDrawerHeader:
UserAccountsDrawerHeader(
  accountEmail: Text("[email protected]"),
  accountName: Text("John Doe"),
  currentAccountPicture: ClipRRect(
    borderRadius: BorderRadius.circular(110),
    child: Image.asset("images/user1.jpg", fit: BoxFit.cover,),
  ),
  otherAccountsPictures: <Widget>[
    ClipRRect(
      borderRadius: BorderRadius.circular(110),
      child: Image.asset("images/user2.jpg", fit: BoxFit.cover,),
    ),
    ClipRRect(
      borderRadius: BorderRadius.circular(110),
      child: Image.asset("images/user3.jpg", fit: BoxFit.cover,),
    )
  ],
  decoration: BoxDecoration(
    color: Colors.blue
  ),
),
For the image assets to be located by the app, create a images directory and add the images. Then edit pubspec.yaml file so that the images can be located
assets:
  - images/
Let’s add some menu’s to the ListView, for example
ListTile(
  leading: Icon(Icons.assessment),
  title: Text("Assessment"),
  onTap: (){
    // change the content
    //do the operation here...
    //close the drawer
    Navigator.pop(context);
  },
),
ListTile(
  leading: Icon(Icons.school),
  title: Text("School"),
  onTap: (){
    // change the content
    //do the operation here...
    //close the drawer
    Navigator.pop(context);
  },
),
Define a new variable _selectedFragment:
Widget _selectedFragment = AssesmentFragment();
The variable stores the fragment to display and use the variable to display the content, so the body part changes to:
body: Container(
  padding: EdgeInsets.all(8),
  child: _selectedFragment,
)
Now for menu click in the navigation drawer, we update the fragment
ListTile(
  leading: Icon(Icons.assessment),
  title: Text("Assessment"),
  onTap: (){
    setState(() {
      _selectedFragment = AssesmentFragment();
    });
    Navigator.pop(context);
  },
),
ListTile(
  leading: Icon(Icons.school),
  title: Text("School"),
  onTap: (){
    setState(() {
      _selectedFragment = SchoolFragment();
    });
    Navigator.pop(context);
  },
),
The code for AssesmentFragment is:
import 'package:flutter/material.dart';

class AssesmentFragment extends StatelessWidget{
  @override
  Widget build(BuildContext context) {
    return Text('Assessment Fragment',);
  }
}
The code for SchoolFragment is:
import 'package:flutter/material.dart';

class SchoolFragment extends StatelessWidget{
  @override
  Widget build(BuildContext context) {
    return Text('School Fragment',);
  }
}
Let’s add a menu in the navigation drawer, which instead of updating the screen as a fragment navigates to a separate screen.
ListTile(
  leading: Icon(Icons.announcement),
  title: Text("Announcement"),
  onTap: (){
    Navigator.pop(context);
    Navigator.push(context, MaterialPageRoute(builder: (context)=> NewScreen()));
  },
)
The screen to which the menu click navigates to is:
import 'package:flutter/material.dart';

class NewScreen extends StatefulWidget {
  final String slug;

  _NewScreenState createState() => _NewScreenState();

  NewScreen({ this.slug});
}

class _NewScreenState extends State<NewScreen> {
  String _pageContent = "New screen content";
  String _pageTitle = "NewScreen";

  @override
  void initState() {
    super.initState();
  }

  @override
  Widget build(BuildContext context) {
    return Scaffold(
      appBar: AppBar(
        title: Text(_pageTitle),
      ),
      body: Container(
        padding: EdgeInsets.all(8),
        child: Column(
          children: <Widget>[
            Container(
                child:Text(
                    _pageContent
                )
            ),
          ],
        ),
      ),
    );
  }
}
We still have one problem, we see grey color in the statusbar area of the navigation drawer which can be fixed by adding the following lines to the build function before
return function:
SystemChrome.setSystemUIOverlayStyle(SystemUiOverlayStyle.light.copyWith(
    statusBarColor: Colors.blueAccent
));
The final main.dart file looks as follows:
import 'package:flutter/material.dart';
import 'package:flutter/services.dart';
import 'package:navigation_drawer_example/NewScreen.dart';
import 'fragments/AssesmentFragment.dart';
import 'fragments/SchoolFragment.dart';

void main() => runApp(MyApp());

class MyApp extends StatelessWidget {
  @override
  Widget build(BuildContext context) {
    return MaterialApp(
      title: 'Flutter Demo',
      debugShowCheckedModeBanner: false,
      theme: ThemeData(
        primarySwatch: Colors.blue,
      ),
      home: MyHomePage(title: 'Navigation Drawer Example'),
    );
  }
}

class MyHomePage extends StatefulWidget {
  MyHomePage({Key key, this.title}) : super(key: key);

  final String title;

  @override
  _MyHomePageState createState() => _MyHomePageState();
}

class _MyHomePageState extends State<MyHomePage> {

  Widget _selectedFragment = AssesmentFragment();

  @override
  Widget build(BuildContext context) {
    SystemChrome.setSystemUIOverlayStyle(SystemUiOverlayStyle.light.copyWith(
        statusBarColor: Colors.blueAccent
    ));
    return Scaffold(
      appBar: AppBar(
        title: Text(widget.title),
      ),
      drawer: Drawer(
        child: ListView(
          children: <Widget>[
          UserAccountsDrawerHeader(
            accountEmail: Text("[email protected]"),
            accountName: Text("John Doe"),
            currentAccountPicture: ClipRRect(
              borderRadius: BorderRadius.circular(110),
              child: Image.asset("images/user1.jpg", fit: BoxFit.cover,),
            ),
            otherAccountsPictures: <Widget>[
              ClipRRect(
                borderRadius: BorderRadius.circular(110),
                child: Image.asset("images/user2.jpg", fit: BoxFit.cover,),
              ),
              ClipRRect(
                borderRadius: BorderRadius.circular(110),
                child: Image.asset("images/user3.jpg", fit: BoxFit.cover,),
              )
            ],
            decoration: BoxDecoration(
              color: Colors.blue
            ),
          ),
            ListTile(
              leading: Icon(Icons.assessment),
              title: Text("Assessment"),
              onTap: (){
                setState(() {
                  _selectedFragment = AssesmentFragment();
                });
                Navigator.pop(context);
              },
            ),
            ListTile(
              leading: Icon(Icons.school),
              title: Text("School"),
              onTap: (){
                setState(() {
                  _selectedFragment = SchoolFragment();
                });
                Navigator.pop(context);
              },
            ),
            ListTile(
              leading: Icon(Icons.announcement),
              title: Text("Announcement"),
              onTap: (){
                Navigator.pop(context);
                Navigator.push(context, MaterialPageRoute(builder: (context)=> NewScreen()));
              },
            )
          ],
        ),
      ),
      body: Container(
        padding: EdgeInsets.all(8),
        child: _selectedFragment,
      )
    );
  }
}
Full code can be downloaded from GitHub.
Image Used in the app:
https://unsplash.com/photos/ROJFuWCsfmA
https://unsplash.com/photos/hh3ViD0r0Rc
https://unsplash.com/photos/qmsP-aRLWsc