<?xml version="1.0" encoding="utf-8"?><feed xmlns="http://www.w3.org/2005/Atom" ><generator uri="https://jekyllrb.com/" version="4.2.2">Jekyll</generator><link href="https://parasnath.com.np/blog/feed.xml" rel="self" type="application/atom+xml" /><link href="https://parasnath.com.np/blog/" rel="alternate" type="text/html" /><updated>2022-09-12T10:33:50+00:00</updated><id>https://parasnath.com.np/blog/feed.xml</id><title type="html">Paras Nath’s Blog</title><subtitle>Paras Nath's blog is a technical blog related to information technology. It is dedicated to sharing articles on the topics: open source, Linux, entrepreneur, programming, event.</subtitle><author><name>Paras Nath Chaudhary</name></author><entry><title type="html">Fixing ‘Operation not permitted’ error in the terminal of MacOS</title><link href="https://parasnath.com.np/blog/fixing-operation-not-permitted-error-in-the-terminal-of-MacOS/" rel="alternate" type="text/html" title="Fixing ‘Operation not permitted’ error in the terminal of MacOS" /><published>2020-03-04T02:45:02+00:00</published><updated>2020-03-04T02:45:02+00:00</updated><id>https://parasnath.com.np/blog/fixing-operation-not-permitted-error-in-the-terminal-of-MacOS</id><content type="html" xml:base="https://parasnath.com.np/blog/fixing-operation-not-permitted-error-in-the-terminal-of-MacOS/"><![CDATA[<p>Today, I updated my Early 2015 MBP. When I fired up Terminal and tried running a few commands like ‘ls’, ‘pwd’, etc I was getting strange error ‘Operation not permitted.’ I looked for solutions on the internet and found a solution <a href="https://osxdaily.com/2018/10/09/fix-operation-not-permitted-terminal-error-macos/">here</a>. The step by step solution is as follows:
<!--more--></p>

<p>Steps:</p>
<ol>
  <li>Close Terminal</li>
  <li>Open System Preferences</li>
  <li>Choose ‘Security &amp; Privacy’</li>
  <li>Select Privacy Tab</li>
  <li>From Left side menu select ‘Full Disk Access’</li>
  <li>Click the ‘lock’ icon on the lower left part and authenticate the user with admin privileges</li>
  <li>Click the ‘+’ icon, an application chooser dialog box will open. Go to ‘Applications’-&gt;’Utitilites’ and Select <em>Terminal</em></li>
  <li>Open the ‘Terminal’</li>
</ol>]]></content><author><name>Paras Nath Chaudhary</name></author><category term="Troubleshooting" /><category term="MacOS" /><category term="Terminal" /><summary type="html"><![CDATA[Today, I updated my Early 2015 MBP. When I fired up Terminal and tried running a few commands like ‘ls’, ‘pwd’, etc I was getting strange error ‘Operation not permitted.’ I looked for solutions on the internet and found a solution here. The step by step solution is as follows:]]></summary></entry><entry><title type="html">Essentials of Android Databinding</title><link href="https://parasnath.com.np/blog/essentials-of-android-databinding/" rel="alternate" type="text/html" title="Essentials of Android Databinding" /><published>2020-02-22T13:06:02+00:00</published><updated>2020-02-22T13:06:02+00:00</updated><id>https://parasnath.com.np/blog/essentials-of-android-databinding</id><content type="html" xml:base="https://parasnath.com.np/blog/essentials-of-android-databinding/"><![CDATA[<p>The Data Binding Library is a support library that allows you to bind UI components in your layouts to data sources in your app using a declarative format rather than programmatically.
<!--more-->
TLDR;  Let’s just get our hands dirty.</p>

<p>Open your projects app/build.gradle file and add the plugin by adding <em>apply plugin: ‘kotlin-kapt’</em> just above the line with <em>android {</em> as shown below:</p>

<div class="language-gradle highlighter-rouge"><div class="highlight"><pre class="highlight"><code><span class="n">apply</span> <span class="nl">plugin:</span> <span class="s1">'kotlin-kapt'</span>
<span class="n">android</span> <span class="o">{</span>
</code></pre></div></div>

<p>Now, we enable data binding by adding</p>
<div class="language-gradle highlighter-rouge"><div class="highlight"><pre class="highlight"><code><span class="n">dataBinding</span><span class="o">{</span>
    <span class="n">enabled</span> <span class="kc">true</span>
<span class="o">}</span>
</code></pre></div></div>
<p>inside <em>android { }</em>
And then add <em>kapt com.android.databinding:compiler:3.1.4’</em> to the dependencies.</p>

<p>Finally the build.gradle file should have the following configuration:</p>

<div class="language-gradle highlighter-rouge"><div class="highlight"><pre class="highlight"><code><span class="n">apply</span> <span class="nl">plugin:</span> <span class="s1">'kotlin-kapt'</span>
<span class="n">android</span> <span class="o">{</span>

    <span class="n">dataBinding</span><span class="o">{</span>
        <span class="n">enabled</span> <span class="kc">true</span>
    <span class="o">}</span>
<span class="o">}</span>
<span class="k">dependencies</span> <span class="o">{</span>
    <span class="n">kapt</span> <span class="s1">'com.android.databinding:compiler:3.1.4'</span>
<span class="o">}</span>
</code></pre></div></div>
<p>The project is now configured for data binding. To use data binding let’s take the example of the empty project that can be created using Android Studio. Here I will show you after the configuration what you need to do.</p>

<p>First wrap your existing layout file inside a layout tag. Move the xmlns attributes to the layout tag. And also add a data tag inside layout tag. Example:</p>
<div class="language-xml highlighter-rouge"><div class="highlight"><pre class="highlight"><code><span class="cp">&lt;?xml version="1.0" encoding="utf-8"?&gt;</span>
<span class="nt">&lt;layout</span> 
    <span class="na">xmlns:android=</span><span class="s">"http://schemas.android.com/apk/res/android"</span>
    <span class="na">xmlns:app=</span><span class="s">"http://schemas.android.com/apk/res-auto"</span>
    <span class="na">xmlns:tools=</span><span class="s">"http://schemas.android.com/tools"</span><span class="nt">&gt;</span>

    <span class="nt">&lt;data&gt;</span>
    <span class="nt">&lt;/data&gt;</span>

    <span class="nt">&lt;androidx.constraintlayout.widget.ConstraintLayout</span> 
        <span class="na">android:layout_width=</span><span class="s">"match_parent"</span>
        <span class="na">android:layout_height=</span><span class="s">"match_parent"</span>
        <span class="na">tools:context=</span><span class="s">".MainActivity"</span><span class="nt">&gt;</span>

        <span class="nt">&lt;TextView</span>
            <span class="na">android:layout_width=</span><span class="s">"wrap_content"</span>
            <span class="na">android:layout_height=</span><span class="s">"wrap_content"</span>
            <span class="na">android:text=</span><span class="s">"Hello World!"</span>
            <span class="na">app:layout_constraintBottom_toBottomOf=</span><span class="s">"parent"</span>
            <span class="na">app:layout_constraintLeft_toLeftOf=</span><span class="s">"parent"</span>
            <span class="na">app:layout_constraintRight_toRightOf=</span><span class="s">"parent"</span>
            <span class="na">app:layout_constraintTop_toTopOf=</span><span class="s">"parent"</span> <span class="nt">/&gt;</span>

    <span class="nt">&lt;/androidx.constraintlayout.widget.ConstraintLayout&gt;</span>
<span class="nt">&lt;/layout&gt;</span>
</code></pre></div></div>
<p>Build your project. Now in your MainActivity.kt, you can create the binding variable as</p>
<pre><code class="language-kotline">    private lateinit var binding: ActivityMainBinding
</code></pre>
<p>The type of the binding variable is after the name of the xml layout’s filename. Here the layout file name is activity_main.xml. Therefore the binding datatype is ActivityMainBinding. This is obtained by removing the underscore and writing the filename in CamelCase with Binding appended.</p>

<p>Now we can initialize the variable as</p>
<div class="language-kotlin highlighter-rouge"><div class="highlight"><pre class="highlight"><code><span class="n">binding</span> <span class="p">=</span> <span class="nc">DataBindingUtil</span><span class="p">.</span><span class="nf">setContentView</span><span class="p">(</span><span class="k">this</span><span class="p">,</span> <span class="nc">R</span><span class="p">.</span><span class="n">layout</span><span class="p">.</span><span class="n">activity_main</span><span class="p">)</span>
</code></pre></div></div>

<p>The project is configured for data binding. Let’s take a simple example of databinding. We will create a variable inside data tag in the layout xml.</p>
<div class="language-xml highlighter-rouge"><div class="highlight"><pre class="highlight"><code><span class="nt">&lt;data&gt;</span>
    <span class="nt">&lt;variable</span>
        <span class="na">name=</span><span class="s">"message"</span>
        <span class="na">type=</span><span class="s">"String"</span> <span class="nt">/&gt;</span>
<span class="nt">&lt;/data&gt;</span>
</code></pre></div></div>
<p>And then we can use the variable inside the views. For example:</p>
<div class="language-xml highlighter-rouge"><div class="highlight"><pre class="highlight"><code><span class="nt">&lt;TextView</span>
    <span class="na">android:layout_width=</span><span class="s">"wrap_content"</span>
    <span class="na">android:layout_height=</span><span class="s">"wrap_content"</span>
    <span class="na">android:text=</span><span class="s">"@{message}"</span>
    <span class="na">app:layout_constraintBottom_toBottomOf=</span><span class="s">"parent"</span>
    <span class="na">app:layout_constraintLeft_toLeftOf=</span><span class="s">"parent"</span>
    <span class="na">app:layout_constraintRight_toRightOf=</span><span class="s">"parent"</span>
    <span class="na">app:layout_constraintTop_toTopOf=</span><span class="s">"parent"</span> <span class="nt">/&gt;</span>
</code></pre></div></div>
<p>Now in the MainActivity.kt file we can mutate the variable. as</p>
<div class="language-kotlin highlighter-rouge"><div class="highlight"><pre class="highlight"><code><span class="n">binding</span><span class="p">.</span><span class="n">message</span> <span class="p">=</span> <span class="s">"Data Binding Example"</span>
</code></pre></div></div>
<p>The final activity_main.xml file is :</p>
<div class="language-xml highlighter-rouge"><div class="highlight"><pre class="highlight"><code><span class="cp">&lt;?xml version="1.0" encoding="utf-8"?&gt;</span>
<span class="nt">&lt;layout</span> <span class="na">xmlns:android=</span><span class="s">"http://schemas.android.com/apk/res/android"</span>
    <span class="na">xmlns:app=</span><span class="s">"http://schemas.android.com/apk/res-auto"</span>
    <span class="na">xmlns:tools=</span><span class="s">"http://schemas.android.com/tools"</span><span class="nt">&gt;</span>
    <span class="nt">&lt;data&gt;</span>
        <span class="nt">&lt;variable</span>
            <span class="na">name=</span><span class="s">"message"</span>
            <span class="na">type=</span><span class="s">"String"</span> <span class="nt">/&gt;</span>
    <span class="nt">&lt;/data&gt;</span>
    <span class="nt">&lt;androidx.constraintlayout.widget.ConstraintLayout</span>
        <span class="na">android:layout_width=</span><span class="s">"match_parent"</span>
        <span class="na">android:layout_height=</span><span class="s">"match_parent"</span>
        <span class="na">tools:context=</span><span class="s">".MainActivity"</span><span class="nt">&gt;</span>

        <span class="nt">&lt;TextView</span>
            <span class="na">android:layout_width=</span><span class="s">"wrap_content"</span>
            <span class="na">android:layout_height=</span><span class="s">"wrap_content"</span>
            <span class="na">android:text=</span><span class="s">"@{message}"</span>
            <span class="na">app:layout_constraintBottom_toBottomOf=</span><span class="s">"parent"</span>
            <span class="na">app:layout_constraintLeft_toLeftOf=</span><span class="s">"parent"</span>
            <span class="na">app:layout_constraintRight_toRightOf=</span><span class="s">"parent"</span>
            <span class="na">app:layout_constraintTop_toTopOf=</span><span class="s">"parent"</span> <span class="nt">/&gt;</span>

    <span class="nt">&lt;/androidx.constraintlayout.widget.ConstraintLayout&gt;</span>
<span class="nt">&lt;/layout&gt;</span>

</code></pre></div></div>
<p>and the final MainActivity.kt file is</p>
<div class="language-kotlin highlighter-rouge"><div class="highlight"><pre class="highlight"><code><span class="kd">class</span> <span class="nc">MainActivity</span> <span class="p">:</span> <span class="nc">AppCompatActivity</span><span class="p">()</span> <span class="p">{</span>

    <span class="k">private</span> <span class="k">lateinit</span> <span class="kd">var</span> <span class="py">binding</span><span class="p">:</span> <span class="nc">ActivityMainBinding</span>
    <span class="k">override</span> <span class="k">fun</span> <span class="nf">onCreate</span><span class="p">(</span><span class="n">savedInstanceState</span><span class="p">:</span> <span class="nc">Bundle</span><span class="p">?)</span> <span class="p">{</span>
        <span class="k">super</span><span class="p">.</span><span class="nf">onCreate</span><span class="p">(</span><span class="n">savedInstanceState</span><span class="p">)</span>
        <span class="n">binding</span> <span class="p">=</span> <span class="nc">DataBindingUtil</span><span class="p">.</span><span class="nf">setContentView</span><span class="p">(</span><span class="k">this</span><span class="p">,</span> <span class="nc">R</span><span class="p">.</span><span class="n">layout</span><span class="p">.</span><span class="n">activity_main</span><span class="p">)</span>
        <span class="n">binding</span><span class="p">.</span><span class="n">message</span> <span class="p">=</span> <span class="s">"Data Binding Example"</span>
    <span class="p">}</span>
<span class="p">}</span>
</code></pre></div></div>
<p>You can run and verify it.</p>

<p>I hope this was helpful to you to get started in Android DataBinding. There is more to explore and learn. Check out Android docs for more. I also keep writing blog posts like this. So don’t forget to visit this blog again.</p>

<blockquote>
  <p>If you have any questions or suggestion please feel free to write to me.</p>
</blockquote>]]></content><author><name>Paras Nath Chaudhary</name></author><category term="Mobile Development" /><category term="Android" /><category term="Kotlin" /><summary type="html"><![CDATA[The Data Binding Library is a support library that allows you to bind UI components in your layouts to data sources in your app using a declarative format rather than programmatically.]]></summary></entry><entry><title type="html">What I learned about SEO from my blog</title><link href="https://parasnath.com.np/blog/what-i-learned-about-seo-from-my-blog/" rel="alternate" type="text/html" title="What I learned about SEO from my blog" /><published>2020-02-17T02:45:02+00:00</published><updated>2020-02-17T02:45:02+00:00</updated><id>https://parasnath.com.np/blog/-what-i-learned-about-seo-from-my-blog</id><content type="html" xml:base="https://parasnath.com.np/blog/what-i-learned-about-seo-from-my-blog/"><![CDATA[<p>Let me tell you that I am not an SEO expert. These are some of the key learnings 
while I was optimizing my website for Search Engines.
<!--more-->
There have been many times when I thought of starting my blog, wrote a few 
articles and stopped. After a couple of months or a year, the same thing again 
comes to my mind and I start again. This has been happening for a long time. 
While trying to start a blog, I have also had my hands-on Search Engine 
Optimization (SEO). If the posts I write don’t reach you, then its possibly a 
waste of time. So, I tried to make them optimized for SEO. In my previous tries, 
I learned not so much that I have learned this time. So, I am going to share 
some of the things I have been doing for this one.</p>

<p>One quick note here. The tips I am going to share are written from a developer’s perspective. That means, to implement some of it you might have to know some 
programming and server configuration. However, if you don’t know someone from 
your team might be able to help do it.</p>

<p>With a hope that these would help you with your website’s SEO.</p>

<ol>
  <li>URL<br />
It’s always good to have your brand name in the domain. And also 
The next thing is the URL for your website should not be cryptic (hard to 
remember ) or very long.</li>
  <li>Add proper meta tags
    <ol>
      <li>Add language <br />
 This tells the search engines the language your website uses.</li>
      <li>Optimize your title<br />
 Your title should be optimum. A good title should be from 10 to 70 
 characters.</li>
      <li>Add favicon<br />
 Favicon is used for branding. It appears along with the title of the page. 
 A favicon helps users quickly recognize your website.</li>
      <li>Add canonical links<br />
 Using canonical links helps the search engines identify the original content 
 and duplicate content. For example, you have content hosted in 
 abc.com/first-post and you have the same post in xyz.com/first-post. Then 
 you can set up a canonical post on your abc.com website to xyz.com so that 
 the search engines understand. If you don’t have the content on another 
 website. It is still a good idea to use canonical links to reference to the 
 same link. For canonical URLs, use absolute URLs instead of relative URLs.</li>
      <li>Add meta description</li>
    </ol>
  </li>
  <li>Use proper header tags<br />
Use only one H1 tag on a page. This should be the most significant phrase you 
want to highlight on the page. Use other header tags like H2, H3, etc according 
to the phrase’s significance on the page. I usually go with the title of the 
page for the H1 tag.</li>
  <li>Work on the accessibility of your website
    <ol>
      <li>Add alt tags and title to all images
 Example:
        <div class="language-html highlighter-rouge"><div class="highlight"><pre class="highlight"><code> <span class="nt">&lt;img</span> <span class="na">src=</span><span class="s">"example.jpg"</span> <span class="na">alt=</span><span class="s">"Example"</span> <span class="na">title=</span><span class="s">"Example"</span> <span class="nt">/&gt;</span>
</code></pre></div>        </div>
      </li>
      <li>Add a title to all href links.
 Example:
        <div class="language-html highlighter-rouge"><div class="highlight"><pre class="highlight"><code> <span class="nt">&lt;a</span> <span class="na">title=</span><span class="s">"Example Website"</span> <span class="na">href=</span><span class="s">"http://example.com"</span><span class="nt">&gt;</span>Link<span class="nt">&lt;/a&gt;</span>
</code></pre></div>        </div>
      </li>
      <li>Use proper contrast</li>
    </ol>
  </li>
  <li>Use schema to structure your data<br />
 Despite the advancements, Machines still cannot understand what we humans 
 can. So, it is a good idea to structure your data so that machines can 
 actually understand what your website is about. You can learn more about 
 this at <a href="https://schema.org/">here</a></li>
  <li>Speed up your website
    <ol>
      <li>use compression in your webserver</li>
      <li>Minify your assets</li>
      <li>Use CDN to serve static files</li>
      <li>Defer your CSS and javascript files<br />
 It’s quite easy to load javascript files asynchronously. To do so simply 
 use the async keyword as follows:
        <div class="language-html highlighter-rouge"><div class="highlight"><pre class="highlight"><code> <span class="nt">&lt;script </span><span class="na">async</span> <span class="na">src=</span><span class="s">"script.js"</span><span class="nt">&gt;&lt;/script&gt;</span>
</code></pre></div>        </div>
        <p>However, for CSS, I use a trick that I found 
 <a href="https://www.filamentgroup.com/lab/load-css-simpler/">here</a>. The code is as 
 follows:
 ```html</p>
      </li>
    </ol>
    <link rel="stylesheet" type="text/css" href="style.css" media="print" onload="this.media='all'" />

    <p>```</p>
    <ol>
      <li>Server your assets from cookieless domain</li>
    </ol>
  </li>
  <li>Properly configure your web server for security
    <ol>
      <li>Use HTTPS</li>
      <li>Setup appropriate headers<br />
 At a minimum I suggest you to set up the following headers:
        <ol>
          <li>X-Frame-Options</li>
          <li>X-Xss-Protection</li>
          <li>X-Content-Type-Options</li>
          <li>Feature-Policy</li>
          <li>Content-Security-Policy</li>
        </ol>
      </li>
    </ol>
  </li>
  <li>Submit to search engines
    <ol>
      <li>Submit to Google Search Console.</li>
      <li>Submit to Bing Webmasters</li>
      <li>Submit to Yandex</li>
    </ol>
  </li>
  <li>Keep your website fresh</li>
  <li>Create a sitemap file <br />
A sitemap is usually am XML file that tells web crawlers about the structure of 
your website. An example of sitemap is as follows:
```xml
&lt;?xml version=”1.0” encoding=”UTF-8”?&gt;</li>
</ol>
<urlset xmlns="http://www.sitemaps.org/schemas/sitemap/0.9">
	<url>
		<loc>https://parasnath.com.np/</loc>
		<lastmod>2020-01-03</lastmod>
		<changefreq>weekly</changefreq>
		<priority>0.8</priority>
	</url>
	<url>
		<loc>https://parasnath.com.np/blog/</loc>
		<lastmod>2020-01-03</lastmod>
		<changefreq>weekly</changefreq>
		<priority>0.9</priority>
	</url>	
</urlset>
<div class="language-plaintext highlighter-rouge"><div class="highlight"><pre class="highlight"><code>12. Create proper robots file, an example is as follows:
```txt
User-Agent: *
Disallow: /readme.md

# Directories
Disallow: /zohoverify/
# Sitemap
Sitemap: http://parasnath.com.np/sitemap.xml

User-Agent: Googlebot
Allow: /*.js*
Allow: /*.css*
Allow: /*.jpg*
</code></pre></div></div>
<ol>
  <li>Add Analytics<br />
Adding analytics is crucial for your blog to better understand your audience.</li>
</ol>

<p>I know, I haven’t covered all that I have done with my blog. I will keep 
elaborating on the points I have made above in my later posts. In the meantime 
I will list some of the tools I use for my SEO here:</p>
<ul>
  <li><a href="https://www.seoquake.com/index.html">SEOQuake</a></li>
  <li><a href="https://search.google.com/structured-data/testing-tool">Structured Data Testing Tool</a></li>
  <li><a href="https://www.immuniweb.com/websec/">Immuniweb</a></li>
  <li><a href="https://developers.google.com/web/tools/lighthouse/">LightHouse</a></li>
  <li><a href="https://www.semrush.com/">SemRush</a></li>
</ul>]]></content><author><name>Paras Nath Chaudhary</name></author><category term="SEO" /><category term="SEO" /><summary type="html"><![CDATA[Let me tell you that I am not an SEO expert. These are some of the key learnings while I was optimizing my website for Search Engines.]]></summary></entry><entry><title type="html">OWASP TOP 10 Proactive Controls in Brief</title><link href="https://parasnath.com.np/blog/owasp-top-10-proactive-controls-in-short/" rel="alternate" type="text/html" title="OWASP TOP 10 Proactive Controls in Brief" /><published>2020-02-17T02:45:02+00:00</published><updated>2020-02-17T02:45:02+00:00</updated><id>https://parasnath.com.np/blog/owasp-top-10-proactive-controls-in-short</id><content type="html" xml:base="https://parasnath.com.np/blog/owasp-top-10-proactive-controls-in-short/"><![CDATA[<p>Software Security is a measure concern today. We can no longer tolerate simple security problems leading to a security havoc. Here I want to list the top 10 proactive controls that should be practiced during software development to create a secure software.
<img src="/blog/assets/img/owasp-top-10-proactive-controls.png" alt="OWASP Top 10 Proactive Controls" />
<!--more--></p>

<p>OWASP Top 10 Proactive controls is a list of security technique that should be considered for every software development. They top 10 controls are listed as follows in the order of their importance, first being the topmost priority.</p>

<ul>
  <li>Define Security Requirements<br />
 A security requirement is a statement of needed security functionality that ensures one of the many different security properties of software being satisfied. OWASP Application Security Verification Standard (ASVS) can be used to define security requirements. <a href="https://www.owasp.org/index.php/Category:OWASP_Application_Security_Verification_Standard_Project">OWASP ASVS</a> is a catalog of available security requirements and verification criteria.</li>
  <li>
    <p>Leverage security frameworks and libraries<br />
 A developer writing an application might not have sufficient knowledge, time or budget to properly implement or maintain security features. Therefore, secure coding libraries and frameworks should be leveraged as much as possible. The embedded security in such libraries and frameworks help guard against security-related design and implementation flaws.</p>
  </li>
  <li>Secure database access<br />
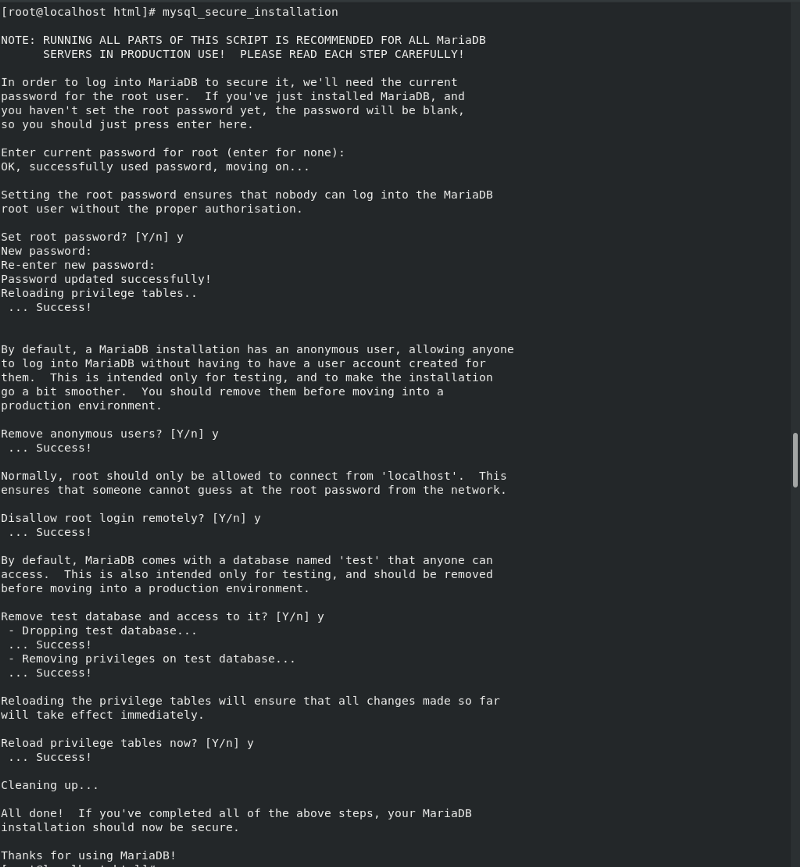
  While making a database secure, the following four areas should be considered:
    <ul>
      <li>Secure Query</li>
      <li>Secure configuration</li>
      <li>Secure authentication</li>
      <li>Secure communication</li>
    </ul>
  </li>
  <li>
    <p>Encode and Escape data<br />
 This is the main attack points used for SQL injection. Data should be properly encoded before they are used in the target like in the Database query so that the inputs are safe. And while displaying the data back to the users, they can be escaped so that the data appears as the user expects.</p>
  </li>
  <li>
    <p>Validate all inputs<br />
 This is a programming technique to ensure only the correct format of data enters the system. These can be done with the help of regex matches.</p>
  </li>
  <li>
    <p>Implement digital identity<br />
 The implementation of digital identity refers to the implementation of a proper authentication system so that the system knows who the user is.</p>
  </li>
  <li>
    <p>Enforce access controls<br />
 Enforcing access controls refers to the implementation of proper authorization i.e. to allow or deny specific requests to a user, program or process.</p>
  </li>
  <li>
    <p>Protect data everywhere<br />
 A software system might collect data like passwords, card numbers, health records, personal details, etc. These kinds of data should be protected. Proper hashing and encryption should be done so that they are not compromised by a third party.</p>
  </li>
  <li>
    <p>Implement Security Logging and Monitoring<br />
 Logging is commonly used by developers for diagnostic purposes. The same tools and patterns can be used to log security information like authentication, authorization, etc. So that they can be monitored.</p>
  </li>
  <li>Handle all errors and exceptions<br />
 Handling errors and exceptions occur in all areas of an application including critical business logic as well as security features and framework code. Certain attacks against the system can trigger errors and exceptions so handling error and exception can be used in the form of an intrusion detection system.</li>
</ul>

<p>These are the basic things a developer should practice. It should be taken as the baseline standard and not as the comprehensive security steps to be followed. I will be discussing more security controls that needs to be followed to secure your software in my upcoming posts.</p>

<p>You can find the full document <a href="https://www.owasp.org/images/b/bc/OWASP_Top_10_Proactive_Controls_V3.pdf">here</a>.</p>]]></content><author><name>Paras Nath Chaudhary</name></author><category term="Security" /><category term="Security" /><category term="OWASP" /><summary type="html"><![CDATA[Software Security is a measure concern today. We can no longer tolerate simple security problems leading to a security havoc. Here I want to list the top 10 proactive controls that should be practiced during software development to create a secure software.]]></summary><media:thumbnail xmlns:media="http://search.yahoo.com/mrss/" url="https://parasnath.com.np/blog/assets/img/owasp-top-10-proactive-controls.png" /><media:content medium="image" url="https://parasnath.com.np/blog/assets/img/owasp-top-10-proactive-controls.png" xmlns:media="http://search.yahoo.com/mrss/" /></entry><entry><title type="html">Force install npm in Arch Linux</title><link href="https://parasnath.com.np/blog/force-install-npm-in-arch-linux/" rel="alternate" type="text/html" title="Force install npm in Arch Linux" /><published>2020-02-13T02:45:02+00:00</published><updated>2020-02-13T02:45:02+00:00</updated><id>https://parasnath.com.np/blog/force-install-npm-in-arch-linux</id><content type="html" xml:base="https://parasnath.com.np/blog/force-install-npm-in-arch-linux/"><![CDATA[<p>I have been using Arch Linux for the past couple of years. Last year, I changed
to Manjaro, which is also an Arch Linux based distro. Recently, I came across a
problem after I was trying to update the system. Here I will explain the problem 
that I faced and the solution. 
<!--more-->
In the past, whenever I updated the packages and had any issue I was able to use <em>–force</em> option. This option used to solve almost all of my problems. The recent version of pacman/yaourt does not have the <em>–force</em> option.</p>

<p>Today while I was updating <strong>npm</strong> I got into a similar situation. The error was as follows:</p>

<div class="language-bash highlighter-rouge"><div class="highlight"><pre class="highlight"><code>error: failed to commit transaction <span class="o">(</span>conflicting files<span class="o">)</span>
npm: /usr/lib/node_modules/npm/lib/utils/stringify-package.js exists <span class="k">in </span>filesystem

// lines clipped ...

Errors occurred, no packages were upgraded.
</code></pre></div></div>

<p>I searched the internet for a while then I stumbled upon this <a href="https://github.com/nodesource/distributions/issues/636">issue</a>. It is the solution by <a href="https://github.com/n0noob">n0noob</a>. The solution is to use 
<em>–overwrite=’*‘</em>.</p>

<p>So the final command would be</p>
<blockquote>
  <p>sudo pacman -S npm –overwrite=’*’</p>
</blockquote>

<p>And this solved my problem.  This applies to Arch Linux and other distros based on Arch Linux.</p>

<blockquote>
  <p>Caution: Use –overwrite=’*’ at your own risk. This command might result in an unusable system. Use it only if you know what you are doing.</p>
</blockquote>]]></content><author><name>Paras Nath Chaudhary</name></author><category term="Linux" /><category term="Linux" /><summary type="html"><![CDATA[I have been using Arch Linux for the past couple of years. Last year, I changed to Manjaro, which is also an Arch Linux based distro. Recently, I came across a problem after I was trying to update the system. Here I will explain the problem that I faced and the solution.]]></summary></entry><entry><title type="html">January month in review</title><link href="https://parasnath.com.np/blog/january-month-in-review/" rel="alternate" type="text/html" title="January month in review" /><published>2020-02-01T02:45:02+00:00</published><updated>2020-02-01T02:45:02+00:00</updated><id>https://parasnath.com.np/blog/january-month-in-review</id><content type="html" xml:base="https://parasnath.com.np/blog/january-month-in-review/"><![CDATA[<p><a href="https://phansch.net/">Philipp Hansch’s blog</a> inspired me to write monthly reviews. I want to take this as an opportunity to take a look back at the month and look forward to the next month so that I can learn from my past and make the future better.<!--more--> I believe it will be a moment for me to reflect on my own activities.</p>

<p>I will write the monthly review by organizing it in three sections. The first section will be ‘what went well?’ where I will be listing what activities went well the last month. The next section will be ‘what could have been improved?’. This is the section where I evaluate the activities I performed and see where I could have done better and what went wrong. It will also be a section to have a takeaway from the month gone. The final section would be ‘For next month’ where I want to share what I want to achieve in the next month. So, let’s get started.</p>

<h2 id="what-went-well">What went well?</h2>
<p>This year started pretty well. January was a month with a ton of excitement. I had a lot of learnings. This month I performed the following activities.</p>
<ul>
  <li>Published the following blog posts for my blog
    <ul>
      <li><a href="https://parasnath.com.np/blog/load-balancing-with-pound/">Load balancing with Pound</a></li>
      <li><a href="https://parasnath.com.np/blog/">Using Custom fonts with Flutter</a></li>
      <li><a href="https://parasnath.com.np">Setting up lamp server along with reverse proxy using Nginx</a></li>
    </ul>
  </li>
  <li>Optimized SEO of my blog</li>
  <li>Prepared and attended <a href="http://psc.gov.np/">PSC</a> practical exam</li>
  <li>CWP migration</li>
  <li>At work:
    <ul>
      <li>Finished two security audit report</li>
      <li>Deployed CRM application in CentOS using docker</li>
      <li>Studied about <a href="https://www.owasp.org/images/b/bc/OWASP_Top_10_Proactive_Controls_V3.pdf">OWASP Top 10 Proactive Controls V3</a></li>
    </ul>
  </li>
  <li>Studied for my internal exams of Masters Second Semester</li>
  <li>Study the recent advancements in Cache Memory Technology</li>
</ul>

<h2 id="what-could-have-been-improved">What could have been improved?</h2>
<ul>
  <li>Fix the sleep schedule</li>
  <li>Focus more on the studies during the exams instead of procrastinating and watching movies</li>
  <li>Improve writing skills</li>
</ul>

<h2 id="for-next-month">For next month</h2>
<p>For the next month, February, I plan to do the following activities:</p>
<ul>
  <li>Learn about e-mail marketing</li>
  <li>Learn to use active voice instead of passive voice in my technical writings</li>
  <li>Attend final exam of Masters in Computer Science (Second Semester)</li>
</ul>

<p>Keep an eye for the next month’s monthly review here.</p>]]></content><author><name>Paras Nath Chaudhary</name></author><category term="Monthly Review" /><category term="Review" /><category term="January" /><summary type="html"><![CDATA[Philipp Hansch’s blog inspired me to write monthly reviews. I want to take this as an opportunity to take a look back at the month and look forward to the next month so that I can learn from my past and make the future better.]]></summary></entry><entry><title type="html">Problems faced while updating/upgrading WordPress</title><link href="https://parasnath.com.np/blog/problems-faced-while-updating-upgrading-wordpress/" rel="alternate" type="text/html" title="Problems faced while updating/upgrading WordPress" /><published>2020-01-24T14:45:02+00:00</published><updated>2020-01-24T14:45:02+00:00</updated><id>https://parasnath.com.np/blog/problems-faced-while-updating-upgrading-wordpress</id><content type="html" xml:base="https://parasnath.com.np/blog/problems-faced-while-updating-upgrading-wordpress/"><![CDATA[<p>Keeping the software up to date is one of the methods to keep your software secure.
In this post, I am going to share solutions to some of the common issues you might
face while updating/upgrading your WordPress Applications. 
<!--more-->
WordPress is a blogging and content management system based on PHP and MySQL. It is a free and open-source content management system licensed under GPLv2. It started as a blogging platform in 2003. The use of WordPress has exploded and now it is the platform of choice for over 35% of all sites across the web.</p>

<p>WordPress has features like Customizable design, Responsive design, SEO friendliness, high security, high performance, powerful media management, ease of use, accessibility, etc. It is very extensive and has over 54,000 plugins. It is, therefore, a platform of choice not just for hobby blogs but also biggest news sites online and online stores.</p>

<p>WordPress can be viewed in the following 4 component architecture:</p>
<ul>
  <li>
    <p>WP Core<br />
WP Core is a set of code that provides the backbone of WordPress. WP Core includes the main WordPress Framework files, configurations, admin panel, etc.</p>
  </li>
  <li>
    <p>WP Theme<br />
It is the visual aspect that is for external users. It contains a set of files that determine the look and feel of the WordPress website.</p>
  </li>
  <li>
    <p>WP Plugin<br />
It is the third party customization aspect to add features and functionalities upon the existing WordPress functionalities.</p>
  </li>
  <li>
    <p>WP Media<br />
It is a set of files such as images, audios, videos, etc. It is a storage directory for the media files that are uploaded from the dashboard.</p>
  </li>
</ul>

<p>WordPress Security is a huge importance for any WordPress website owner. No software is 100% secure. Bugs and vulnerabilities can be discovered as time passes. Therefore, regular patches are done to the existing software system. So, one of the ways to have a secure website is to have the latest software running. For this, WordPress has an update/upgrade feature that needs to be done on a regular basis.</p>

<p>However, update/upgrade does not go well every time. There are times when the update/upgrade fails and the website goes down. Here I will discuss the two kinds of problems that we face in such a case which are discussed as follows:</p>
<ol>
  <li>
    <p>Stuck at maintenance mode 
During the update/upgrade of WordPress themes and plugins, WordPress downloads the required update files. Before it starts applying the changes to the instance of WordPress installation, it switches to maintenance mode and once the update is complete, it switches back to production mode. Switching to maintenance mode is important to do the update in a seamless manner without letting the visitors know what is going behind the scene. Also, during the update, the application might reveal information that might impose security risk on the web application. Switching to maintenance mode is done by creating a .maintenance file in the root directory of the WordPress maintenance directory. To remove the maintenance mode, all we need to do is delete the file ‘.maintenance’.</p>
  </li>
  <li>
    <p>Another update is currently in progress<br />
The second kind of problem you might face is ‘Another update is currently in progress’. This happens when WordPress update is started but it never completes. In such a case, you will see that you still have an outdated WordPress. But the upgrade button doesn’t let you upgrade it. It displays the message. ‘Another update is currently in progress’. To fix this issue, you need to access the database system, In your <em>{tbl_prefix}_options</em> table search for option_name=’core_updater.lock’ and delete. After the deletion, you will now be able to upgrade the WordPress installation to the latest version.</p>
  </li>
</ol>]]></content><author><name>Paras Nath Chaudhary</name></author><category term="Web Development" /><category term="WordPress" /><summary type="html"><![CDATA[Keeping the software up to date is one of the methods to keep your software secure. In this post, I am going to share solutions to some of the common issues you might face while updating/upgrading your WordPress Applications.]]></summary></entry><entry><title type="html">Linux Commands for beginners</title><link href="https://parasnath.com.np/blog/linux-commands-for-beginners/" rel="alternate" type="text/html" title="Linux Commands for beginners" /><published>2020-01-20T02:45:02+00:00</published><updated>2020-01-20T02:45:02+00:00</updated><id>https://parasnath.com.np/blog/linux-commands-for-beginners</id><content type="html" xml:base="https://parasnath.com.np/blog/linux-commands-for-beginners/"><![CDATA[<p>There has been a common misbelief that you need to learn to use the command line to use a Linux Computer. This is completely baseline. You can use Linux even without using the terminal. <!--more-->Distro’s like Ubuntu, Mint, etc do not require you to touch the terminal to use it. However, to harness the potential its good to know about the command lines. Here in this post, I am going to show you a few basic commands that you would help you get started and feel comfortable.
 <br />
 <br />
So, fire up your terminal and let’s get started with the very basic things.</p>

<ul>
  <li><strong>Files &amp; Directories:</strong><br />
  To list the files and directories, use the command ls Example:
    <div class="language-bash highlighter-rouge"><div class="highlight"><pre class="highlight"><code>  <span class="nv">$ </span><span class="nb">ls</span>
</code></pre></div>    </div>
    <p>This is the most basic usage. It will list the files and directories. However, this will not display the files or folders that are hidden.</p>
    <blockquote>
      <p>Hidden file is a file that starts with a ‘dot’, example ‘.file3’</p>
    </blockquote>

    <p>To list all files including the hidden files use -a. Example</p>
    <div class="language-bash highlighter-rouge"><div class="highlight"><pre class="highlight"><code>  <span class="nv">$ </span><span class="nb">ls</span> <span class="nt">-a</span>
</code></pre></div>    </div>
    <p>     <br />
  To create a directory:</p>
    <div class="language-bash highlighter-rouge"><div class="highlight"><pre class="highlight"><code>  <span class="nv">$ </span><span class="nb">mkdir </span>foldername
</code></pre></div>    </div>
    <p> <br />
  To create a text file:</p>

    <div class="language-bash highlighter-rouge"><div class="highlight"><pre class="highlight"><code>  <span class="nv">$ </span><span class="nb">touch </span>filename
</code></pre></div>    </div>
    <p>To read the contents of a file:</p>
    <div class="language-bash highlighter-rouge"><div class="highlight"><pre class="highlight"><code>  <span class="nv">$ </span>less filename
</code></pre></div>    </div>
    <p>To read the first few lines of a file:</p>
    <div class="language-bash highlighter-rouge"><div class="highlight"><pre class="highlight"><code>  <span class="nv">$ </span><span class="nb">head </span>filename
</code></pre></div>    </div>
    <p>To read the last few lines of a file:</p>
    <div class="language-bash highlighter-rouge"><div class="highlight"><pre class="highlight"><code>  <span class="nv">$ </span><span class="nb">tail </span>filename
</code></pre></div>    </div>
    <p>To copy a file:</p>
    <div class="language-bash highlighter-rouge"><div class="highlight"><pre class="highlight"><code>  <span class="nv">$ </span><span class="nb">cp </span>file1 newfile
</code></pre></div>    </div>
    <p>To move a file:</p>
    <div class="language-bash highlighter-rouge"><div class="highlight"><pre class="highlight"><code>  <span class="nv">$ </span><span class="nb">mv </span>file1 newfile
</code></pre></div>    </div>
    <p>To delete a file:</p>
    <div class="language-bash highlighter-rouge"><div class="highlight"><pre class="highlight"><code>  <span class="nv">$ </span><span class="nb">rm </span>filename
</code></pre></div>    </div>
    <p>To copy a directory</p>
    <div class="language-plaintext highlighter-rouge"><div class="highlight"><pre class="highlight"><code>  $ cp -r dir1 dir2
</code></pre></div>    </div>

    <p>To change directory:</p>
    <div class="language-bash highlighter-rouge"><div class="highlight"><pre class="highlight"><code>  <span class="nv">$ </span><span class="nb">cd </span>directoryname
</code></pre></div>    </div>
    <p>To go up one directory:</p>
    <div class="language-bash highlighter-rouge"><div class="highlight"><pre class="highlight"><code>  <span class="nv">$ </span><span class="nb">cd</span> ..
</code></pre></div>    </div>
    <p>To go to the $HOME directory</p>
    <div class="language-bash highlighter-rouge"><div class="highlight"><pre class="highlight"><code>  <span class="nv">$ </span><span class="nb">cd</span>
</code></pre></div>    </div>
    <blockquote>
      <p>$HOME is the login directory of the user. Usually it is /home/<em>username</em></p>
    </blockquote>
  </li>
</ul>

<p> </p>
<ul>
  <li>
    <p><strong>Network</strong><br />
  Now, let’s learn about some of the network commands.</p>

    <p>The first command you need to learn is the ping command to check the connectivity. The most common use is to check if you are connected to your router or the internet. Example:</p>
    <div class="language-bash highlighter-rouge"><div class="highlight"><pre class="highlight"><code>  <span class="nv">$ </span>ping google.com
</code></pre></div>    </div>

    <p>Let’s find out the IP address of the computer to do so, use the ip command as follows:</p>
    <div class="language-plaintext highlighter-rouge"><div class="highlight"><pre class="highlight"><code>  $ ip addr
</code></pre></div>    </div>
    <p>Download a file from the internet using the wget command:</p>
    <div class="language-bash highlighter-rouge"><div class="highlight"><pre class="highlight"><code>  <span class="nv">$ </span>wget url_of_file
</code></pre></div>    </div>
  </li>
</ul>

<p> </p>
<ul>
  <li>
    <p><strong>Monitoring</strong><br />
  Let’s now look at some of the monitoring commands.</p>

    <p>Let’s find out the memory usage of the system. We will see the total RAM available and it’s use space along with details of swap space. For this purpose, we use the <strong>free</strong> command as follows:</p>
    <div class="language-bash highlighter-rouge"><div class="highlight"><pre class="highlight"><code>  <span class="nv">$ </span>free
</code></pre></div>    </div>
    <p>Next, let’s find the total disk usage of our system. This will show you the different disk partitions, their size, and usage information</p>
    <div class="language-bash highlighter-rouge"><div class="highlight"><pre class="highlight"><code>  <span class="nv">$ </span><span class="nb">df</span> <span class="nt">-h</span>
</code></pre></div>    </div>
    <p>Now let’s look at the open process along with the information like process id, the user who created the process, etc.:</p>
    <div class="language-bash highlighter-rouge"><div class="highlight"><pre class="highlight"><code>  <span class="nv">$ </span>ps aux
</code></pre></div>    </div>
    <p>You can also use the top command to monitor the current process, memory usage, etc.</p>
    <div class="language-bash highlighter-rouge"><div class="highlight"><pre class="highlight"><code>  <span class="nv">$ </span>top
</code></pre></div>    </div>
    <p> </p>
    <blockquote>
      <p>All the commands discussed above run the same way in almost all the Linux Distros and Unix based machines.</p>
    </blockquote>
  </li>
</ul>

<p> </p>
<ul>
  <li><strong>Software installation</strong><br />
  Software installation using source code is done with the following three commands.
    <div class="language-bash highlighter-rouge"><div class="highlight"><pre class="highlight"><code>  <span class="nv">$ </span>./configure
  <span class="nv">$ </span>make
  <span class="nv">$ </span>make <span class="nb">install</span>
</code></pre></div>    </div>
    <p>It’s always a good idea to look at the README file available along with the source code to know the exact installation steps.</p>

    <p>However, if you want to use the default package manager available in the Linux System you are using. Then the software installation using the command line will be done using different commands in different distros of Linux. So, let’s take a look at a few of the common distros:</p>
    <ul>
      <li>Ubuntu:
  Installation in ubuntu is done using the <strong>apt</strong> or the <strong>apt-get</strong> command. Example to install ‘gimp’ is:
        <div class="language-bash highlighter-rouge"><div class="highlight"><pre class="highlight"><code>  <span class="nv">$ </span><span class="nb">sudo </span>apt <span class="nb">install </span>gimp
</code></pre></div>        </div>
        <p>To remove gimp</p>
        <div class="language-bash highlighter-rouge"><div class="highlight"><pre class="highlight"><code>  <span class="nv">$ </span><span class="nb">sudo </span>apt remove gimp
</code></pre></div>        </div>
      </li>
      <li>Fedora / RedHat / CentOS:
  Installation in Fedora/RedHat/CentOS is done using the <strong>dnf</strong> or the <strong>yum</strong> command. Example:
        <div class="language-bash highlighter-rouge"><div class="highlight"><pre class="highlight"><code>  <span class="nv">$ </span><span class="nb">sudo </span>yum <span class="nb">install </span>gimp
</code></pre></div>        </div>
        <p>To uninstall gimp:</p>
        <div class="language-bash highlighter-rouge"><div class="highlight"><pre class="highlight"><code>  <span class="nv">$ </span><span class="nb">sudo </span>yum remove gimp
</code></pre></div>        </div>
      </li>
      <li>Arch Linux / Manjaro:
  In Arch Linux / Manjaro, we use <strong>pacman</strong>. However, for the AUR packages, there are many package managers. My preferred choice is <strong>yaourt</strong>. Installation using pacman is done as follows:
        <div class="language-bash highlighter-rouge"><div class="highlight"><pre class="highlight"><code>  <span class="nv">$ </span>pacman <span class="nt">-S</span> gimp
</code></pre></div>        </div>
        <p>To uninstall a package, use</p>
        <div class="language-bash highlighter-rouge"><div class="highlight"><pre class="highlight"><code>  <span class="nv">$ </span>pacman <span class="nt">-Rns</span> gimp
</code></pre></div>        </div>
      </li>
    </ul>
  </li>
</ul>

<p>Please let me know in the comments down there if there is any specific command you want to know about.</p>]]></content><author><name>Paras Nath Chaudhary</name></author><category term="Linux" /><category term="Linux" /><category term="Commands" /><summary type="html"><![CDATA[There has been a common misbelief that you need to learn to use the command line to use a Linux Computer. This is completely baseline. You can use Linux even without using the terminal.]]></summary></entry><entry><title type="html">Setting up LAMP server along with reverse proxy using NGINX</title><link href="https://parasnath.com.np/blog/setting-up-lamp-server-along-with-reverse-proxy-using-nginx/" rel="alternate" type="text/html" title="Setting up LAMP server along with reverse proxy using NGINX" /><published>2020-01-20T02:45:02+00:00</published><updated>2020-01-20T02:45:02+00:00</updated><id>https://parasnath.com.np/blog/setting-up-lamp-server-along-with-reverse-proxy-using-nginx</id><content type="html" xml:base="https://parasnath.com.np/blog/setting-up-lamp-server-along-with-reverse-proxy-using-nginx/"><![CDATA[<h2 id="tldr">TL;DR</h2>
<p>In this post, I am going to show you how you can set up a LAMP server along with reverse proxy using Nginx. The system I am using here is CentOS 8.
<!--more-->
Here, we will not just install the packages and but also enable SELinux and configure it to work with the LAMP setup. So, we need to set SELinux to enforcing which can be done by running the following command:</p>
<div class="language-bash highlighter-rouge"><div class="highlight"><pre class="highlight"><code><span class="c"># setenforce 1</span>
</code></pre></div></div>

<p>Now that you have enabled SELinux in your Linux system, Let’s install the Apache server by installing httpd package.</p>
<div class="language-bash highlighter-rouge"><div class="highlight"><pre class="highlight"><code><span class="c"># yum install httpd -y</span>
</code></pre></div></div>

<p>We don’t want to run Apache in port 80 because we want to run Nginx at port 80 so we configure Apache to run at port 81. For this purpose, edit /etc/httpd/conf/httpd.conf and change line ‘Listen 80’ to ‘Listen 81’. Now start httpd</p>
<div class="language-bash highlighter-rouge"><div class="highlight"><pre class="highlight"><code><span class="c"># systemctl enable --now httpd</span>
</code></pre></div></div>

<p>The next step is to install MySQL. In our case, we will be using the MariaDB server which is a fork of MySQL. To install MariaDB run:</p>
<div class="language-bash highlighter-rouge"><div class="highlight"><pre class="highlight"><code><span class="c"># yum module install mariadb -y</span>
</code></pre></div></div>

<p>Now start the database server:</p>
<div class="language-bash highlighter-rouge"><div class="highlight"><pre class="highlight"><code><span class="c"># systemctl enable --now mariadb</span>
</code></pre></div></div>
<p>After installation, it is suggested to secure MySQL by running ‘mysql_secure_installation’:
<img src="/blog/assets/img/mysql-secure-installation.png" alt="MySQL secure installation" /></p>

<p>Now its time to install PHP. </p>
<div class="language-bash highlighter-rouge"><div class="highlight"><pre class="highlight"><code><span class="c"># yum module install php -y</span>
</code></pre></div></div>

<p>To allow PHP connect to MariaDB install php-mysqlnd:</p>
<div class="language-bash highlighter-rouge"><div class="highlight"><pre class="highlight"><code><span class="c"># yum -y install php-mysqlnd</span>
</code></pre></div></div>

<p>Also, allow Apache to connect to MariaDB through the network by running the following command:</p>
<div class="language-bash highlighter-rouge"><div class="highlight"><pre class="highlight"><code><span class="c"># setsebool -P httpd_can_network_connect_db on</span>
</code></pre></div></div>
<p>For PHP based projects the SELinux policy should be httpd_sys_rw_content_t</p>
<div class="language-bash highlighter-rouge"><div class="highlight"><pre class="highlight"><code><span class="c"># semanage fcontext -a -t httpd_sys_rw_content_t  /var/www/html/*.php</span>
</code></pre></div></div>
<p>Now that, we have install LAMP, we will install Nginx and configure reverse proxy:</p>
<div class="language-bash highlighter-rouge"><div class="highlight"><pre class="highlight"><code><span class="c"># yum install nginx -y</span>
</code></pre></div></div>

<p>Start Nginx and set it to start at boot</p>
<div class="language-bash highlighter-rouge"><div class="highlight"><pre class="highlight"><code><span class="c"># systemctl enable - now ngnix</span>
</code></pre></div></div>

<p>To configure the reverse proxy, in your nginx.conf file you can add</p>
<div class="language-plaintext highlighter-rouge"><div class="highlight"><pre class="highlight"><code>server {

    / {
        proxy_pass http://localhost:81/
        index index.html index.html
    }

}
</code></pre></div></div>

<p>Let’s configure the firewall to open the ports 80 and 443 on the system with the following command:</p>
<div class="language-bash highlighter-rouge"><div class="highlight"><pre class="highlight"><code><span class="c"># firewall-cmd - add-service=http - add-service=https - permanent</span>
<span class="c"># firewall-cmd - reload</span>
</code></pre></div></div>

<p>SELinux disables any web server to connect to the network. To enable network connection, we need to set sebool httpd_can_network_connect to on. We use -P option for persistence change across a system reboot.</p>
<div class="language-bash highlighter-rouge"><div class="highlight"><pre class="highlight"><code><span class="c"># setsebool -P httpd_can_network_connect on</span>
</code></pre></div></div>

<p>This can be verified with the command</p>
<div class="language-bash highlighter-rouge"><div class="highlight"><pre class="highlight"><code><span class="c"># getsebool httpd_can_network_connect</span>
</code></pre></div></div>

<p>The output is as follows:
<img src="/blog/assets/img/se-bool-httpd-can-network-connect.png" alt="getsebool httpd_can_network_connect" /></p>]]></content><author><name>Paras Nath Chaudhary</name></author><category term="Linux" /><category term="Nginx" /><category term="LAMP" /><category term="Linux" /><category term="SELinux" /><summary type="html"><![CDATA[TL;DR In this post, I am going to show you how you can set up a LAMP server along with reverse proxy using Nginx. The system I am using here is CentOS 8.]]></summary></entry><entry><title type="html">Using custom fonts with flutter app</title><link href="https://parasnath.com.np/blog/using-custom-fonts-with-flutter-app/" rel="alternate" type="text/html" title="Using custom fonts with flutter app" /><published>2020-01-10T13:06:02+00:00</published><updated>2020-01-10T13:06:02+00:00</updated><id>https://parasnath.com.np/blog/using-custom-fonts-with-flutter-app</id><content type="html" xml:base="https://parasnath.com.np/blog/using-custom-fonts-with-flutter-app/"><![CDATA[<p>The default fonts in the flutter application are great. However, if we want to have custom fonts in the app, we can do that pretty easily. It’s pretty easy to use. First of all, download the .ttf files of the fonts and add them to the ‘fonts’ directory inside your flutter project. The directory structure should be like:
<!--more--></p>
<div class="language-plaintext highlighter-rouge"><div class="highlight"><pre class="highlight"><code>flutter_project/
 - android/
 - build/
 - fonts/
 - ios/
 - lib/
</code></pre></div></div>
<p>Now that you have added the font files to the project, update the pubspec.yaml file as follows:</p>
<div class="language-yaml highlighter-rouge"><div class="highlight"><pre class="highlight"><code><span class="na">fonts</span><span class="pi">:</span>
  <span class="pi">-</span> <span class="na">family</span><span class="pi">:</span> <span class="s">NameOfFont</span>
    <span class="na">fonts</span><span class="pi">:</span>
      <span class="pi">-</span> <span class="na">asset</span><span class="pi">:</span> <span class="s">fonts/NameOfFont.ttf</span>
      <span class="pi">-</span> <span class="na">asset</span><span class="pi">:</span> <span class="s">fonts/NameOfFont-Black.ttf</span>
  <span class="pi">-</span> <span class="na">family</span><span class="pi">:</span> <span class="s">NameOfSecondFont</span>
    <span class="na">fonts</span><span class="pi">:</span>
      <span class="pi">-</span> <span class="na">asset</span><span class="pi">:</span> <span class="s">fonts/NameOfSecondFont.ttf</span>
</code></pre></div></div>
<p>Now that the fonts are added, we can set a font as the default font for the whole app by adding the following line to MaterialApp</p>
<div class="language-dart highlighter-rouge"><div class="highlight"><pre class="highlight"><code><span class="nl">theme:</span> <span class="n">ThemeData</span><span class="p">(</span>
  <span class="nl">fontFamily:</span> <span class="s">'NameOfFont'</span>
<span class="p">),</span>
</code></pre></div></div>

<p>If you want to use it to a specific widget, you can do as follows:</p>
<div class="language-dart highlighter-rouge"><div class="highlight"><pre class="highlight"><code><span class="n">Text</span><span class="p">(</span>
  <span class="s">'Text with custom font'</span><span class="p">,</span>
  <span class="nl">style:</span> <span class="n">TextStyle</span><span class="p">(</span><span class="nl">fontFamily:</span> <span class="s">'NameOfFont'</span><span class="p">),</span>
<span class="p">);</span>
</code></pre></div></div>]]></content><author><name>Paras Nath Chaudhary</name></author><category term="Flutter" /><category term="Fultter" /><category term="Dart" /><category term="Android" /><summary type="html"><![CDATA[The default fonts in the flutter application are great. However, if we want to have custom fonts in the app, we can do that pretty easily. It’s pretty easy to use. First of all, download the .ttf files of the fonts and add them to the ‘fonts’ directory inside your flutter project. The directory structure should be like:]]></summary></entry></feed>